Creating a Password Reset Tool with PowerShell and WinForms
- Vicky Kadam

- Jul 11, 2025
- 6 min read
Updated: Jul 31, 2025
PowerShell is an impressive tool that helps users automate and manage Windows environments effectively. Its flexibility shines through its ability to connect with many components and applications. One of the lesser-known features of PowerShell is its capability to create graphical user interfaces (GUIs) using Windows Forms (WinForms). This guide is designed to help beginners build user-friendly GUIs with PowerShell and WinForms, making scripts more accessible and enjoyable for users, even those who aren’t tech-savvy.
Understanding PowerShell and WinForms
PowerShell runs on the .NET framework, allowing it to utilize WinForms—a set of classes for creating rich desktop applications. By merging PowerShell with WinForms, you can create applications that present data interactively and attractively. With GUIs, users can run scripts without memorizing complex commands. This not only reduces the learning curve for beginners but also improves productivity by simplifying repetitive tasks.
For instance, a survey found that users showed a 40% increase in task completion speed with GUI-based applications compared to command-line operations.
Setting Up Your Environment
Before you start crafting GUIs, ensure that PowerShell is available on your machine. Most Windows systems already have PowerShell installed. To verify your version, open PowerShell and run this command:
```powershell
$PSVersionTable.PSVersion
```
If you find you have an outdated version, consider upgrading to the latest version. PowerShell 7.0 introduced many enhancements, including better performance and new features.
Required Tools
To build WinForms applications in PowerShell, focus on the following tools:
PowerShell ISE: The Integrated Scripting Environment (ISE) offers a user-friendly interface for coding and testing scripts.
Visual Studio (Optional): While not essential, Visual Studio can facilitate more complex designs and debugging of WinForms applications.

Creating Your First WinForms Application
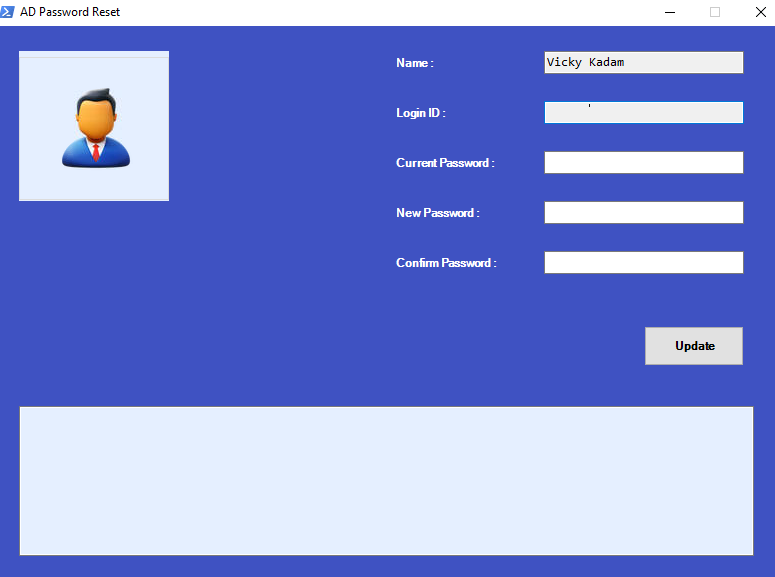
Creating a WinForms application in PowerShell is straightforward. Here’s a step-by-step guide to building a simple Active directory password reset tool:
Step 1: Load the Required Assemblies
First, you need to load the necessary assemblies for creating WinForms:
```powershell
Add-Type -AssemblyName System.Windows.Forms
Add-Type -AssemblyName System.Drawing
Add-Type -AssemblyName System.Web
```
Step 2: Design the Form
Set up your form and its controls. Here is how you can create a basic form with necessary fields:
```powershell
$MainForm = New-Object System.Windows.Forms.Form
$MainForm.FormBorderStyle = "Fixed3D"
$MainForm.StartPosition = "CenterScreen" #loads the window in the center of the screen
#$MainForm.Font = [System.Drawing.Font]::new("Microsoft Sans Serif",8, [System.Drawing.FontStyle]::Bold)
$MainForm.Text = "AD Password Reset"
$MainForm.AutoSize = $false
$MainForm.AutoScale = $true
$MainForm.ControlBox = $true
$MainForm.MaximizeBox = $false
$MainForm.MinimizeBox = $true
#$MainForm.CancelButton = $true
$MainForm.BackColor = "#3f52c2"
#$MainForm.BackColor = "#2E74B5" # Change Form Colour
$MainForm.Size = New-Object System.Drawing.Size(800,600)
$MainForm.WindowState = "Normal"
$MainForm.SizeGripStyle = "Hide"
$Icon = [system.drawing.icon]::ExtractAssociatedIcon($PSHOME + "\powershell.exe") # This can be changed as per requirement
$MainForm.Icon = $Icon
$UserName = New-Object System.Windows.Forms.Label
$UserName.Font = [System.Drawing.Font]::new("Microsoft Sans Serif", 8, [System.Drawing.FontStyle]::Bold)
$UserName.Text = "Name :"
$UserName.AutoSize = $true
$UserName.Location = New-Object System.Drawing.Size(400,30)
$UserName.ForeColor = "White"
$MainForm.Controls.Add($UserName)
$UserNametextBox = New-Object System.Windows.Forms.TextBox
$UserNametextBox.Location = New-Object System.Drawing.Point(550,25) ### Location of the text box
$UserNametextBox.Size = New-Object System.Drawing.Size(200,50) ### Size of the text box
$UserNametextBox.Multiline = $false ### Allows multiple lines of data
$UserNametextBox.Font = New-Object System.Drawing.Font("Consolas",10,[System.Drawing.FontStyle]::Regular)
$UserNametextBox.ReadOnly=$true
$UserNametextBox.Text = Get-aduser $env:UserName | Select -ExpandProperty Name
$MainForm.Controls.Add($UserNametextBox)
$LoginID = New-Object System.Windows.Forms.Label
$LoginID.Font = [System.Drawing.Font]::new("Microsoft Sans Serif", 8, [System.Drawing.FontStyle]::Bold)
$LoginID.Text = "Login ID :"
$LoginID.AutoSize = $true
$LoginID.Location = New-Object System.Drawing.Size(400,80)
$LoginID.AutoSize = $true
$LoginID.ForeColor = "White"
$MainForm.Controls.Add($LoginID)
$LoginIDtextBox = New-Object System.Windows.Forms.TextBox
$LoginIDtextBox.Location = New-Object System.Drawing.Point(550,75) ### Location of the text box
$LoginIDtextBox.Size = New-Object System.Drawing.Size(200,50) ### Size of the text box
$LoginIDtextBox.Multiline = $false ### Allows multiple lines of data
$LoginIDtextBox.Font = New-Object System.Drawing.Font("Consolas",10,[System.Drawing.FontStyle]::Regular)
$LoginIDtextBox.ReadOnly=$true
$LoginIDtextBox.Text = $env:UserName
$MainForm.Controls.Add($LoginIDtextBox)
$CurrentPwd = New-Object System.Windows.Forms.Label
$CurrentPwd.Font = [System.Drawing.Font]::new("Microsoft Sans Serif", 8, [System.Drawing.FontStyle]::Bold)
$CurrentPwd.Text = "Current Password :"
$CurrentPwd.Location = New-Object System.Drawing.Size(400,130)
$CurrentPwd.AutoSize = $true
$CurrentPwd.ForeColor = "White"
$MainForm.Controls.Add($CurrentPwd)
$CurrentPwdtextBox = New-Object System.Windows.Forms.TextBox
$CurrentPwdtextBox.Location = New-Object System.Drawing.Point(550,125) ### Location of the text box
$CurrentPwdtextBox.Size = New-Object System.Drawing.Size(200,50) ### Size of the text box
$CurrentPwdtextBox.Multiline = $false ### Allows multiple lines of data
$CurrentPwdtextBox.Font = New-Object System.Drawing.Font("Consolas",10,[System.Drawing.FontStyle]::Regular)
$CurrentPwdtextBox.ReadOnly=$false
$CurrentPwdtextBox.PasswordChar = "*"
$MainForm.Controls.Add($CurrentPwdtextBox)
$NewPwd = New-Object System.Windows.Forms.Label
$NewPwd.Font = [System.Drawing.Font]::new("Microsoft Sans Serif", 8, [System.Drawing.FontStyle]::Bold)
$NewPwd.Text = "New Password :"
$NewPwd.Location = New-Object System.Drawing.Size(400,180)
$NewPwd.AutoSize = $true
$NewPwd.ForeColor = "White"
$MainForm.Controls.Add($NewPwd)
$NewPwdtextBox = New-Object Windows.Forms.TextBox
$NewPwdtextBox.Location = New-Object System.Drawing.Point(550,175) ### Location of the text box
$NewPwdtextBox.Size = New-Object System.Drawing.Size(200,50) ### Size of the text box
$NewPwdtextBox.Multiline = $false ### Allows multiple lines of data
$NewPwdtextBox.Font = New-Object System.Drawing.Font("Consolas",10,[System.Drawing.FontStyle]::Regular)
$NewPwdtextBox.PasswordChar = "*"
$NewPwdtextBox.ReadOnly=$false
$MainForm.Controls.Add($NewPwdtextBox)
$New2Pwd = New-Object System.Windows.Forms.Label
$New2Pwd.Font = [System.Drawing.Font]::new("Microsoft Sans Serif", 8, [System.Drawing.FontStyle]::Bold)
$New2Pwd.Text = "Confirm Password :"
$New2Pwd.Location = New-Object System.Drawing.Size(400,230)
$New2Pwd.AutoSize = $true
$New2Pwd.ForeColor = "White"
$MainForm.Controls.Add($New2Pwd)
$New2PwdtextBox = New-Object System.Windows.Forms.TextBox
$New2PwdtextBox.Location = New-Object System.Drawing.Point(550,225) ### Location of the text box
$New2PwdtextBox.Size = New-Object System.Drawing.Size(200,50) ### Size of the text box
$New2PwdtextBox.Multiline = $false ### Allows multiple lines of data
$New2PwdtextBox.Font = New-Object System.Drawing.Font("Consolas",10,[System.Drawing.FontStyle]::Regular)
$New2PwdtextBox.ReadOnly=$false
$New2PwdtextBox.PasswordChar = "*"
$MainForm.Controls.Add($New2PwdtextBox)
$UpdateButton = New-Object System.Windows.Forms.Button
$UpdateButton.Location = New-Object System.Drawing.Size(650,300)
$UpdateButton.Size = New-Object System.Drawing.Size(100,40)
$UpdateButton.Font = [System.Drawing.Font]::new("Microsoft Sans Serif", 8, [System.Drawing.FontStyle]::Bold)
$UpdateButton.Text = "Update"
$UpdateButton.UseVisualStyleBackColor = $true
$UpdateButton.TabIndex = 1
#$Button.FlatStyle = [System.Windows.Forms.FlatStyle]::PopUp
$UpdateButton.FlatStyle = [System.Windows.Forms.FlatStyle]::Standard
$UpdateButton.Padding = New-Object System.Windows.Forms.Padding(8)
$UpdateButton.Cursor = [System.Windows.Forms.Cursors]::Hand
#$FindButton.BackColor = "White"
$MainForm.Controls.Add($UpdateButton)
$OutBox = New-Object System.Windows.Forms.TextBox
$OutBox.Location = New-Object System.Drawing.Point(25,380) ### Location of the text box
$OutBox.Size = New-Object System.Drawing.Size(735,150) ### Size of the text box
$OutBox.Multiline = $true ### Allows multiple lines of data
$OutBox.Font = New-Object System.Drawing.Font("Consolas",10,[System.Drawing.FontStyle]::Regular)
$OutBox.BackColor = "#e5efff"
$OutBox.ReadOnly=$true
$MainForm.Controls.Add($OutBox)
$GroupBox = New-Object System.Windows.Forms.GroupBox
$GroupBox.Location = New-Object System.Drawing.Size(25,25)
$GroupBox.Size = New-Object System.Drawing.Size(150,150)
$GroupBox.Padding = New-Object System.Windows.Forms.Padding(10)
#$ButtonGroupBox.BorderStyle = "Fixed3D"
#$ButtonGroupBox.BackColor = "#D7E7F5"
$GroupBox.BackColor = "#e5efff"
$MainForm.Controls.Add($GroupBox)
$file = (get-item '.\icons.ico')
$img = [System.Drawing.Image]::Fromfile($file)
$pictureBox = new-object Windows.Forms.PictureBox
$pictureBox.Image = $img
#$pictureBox.SizeMode = "Autosize"
$pictureBox.Size = New-Object System.Drawing.Size(100,100)
$pictureBox.Location = New-Object System.Drawing.Size(30,30)
$GroupBox.controls.add($pictureBox)
```
Step 3: Add Functionality
Next, you need to implement what happens when the user clicks the "Update" button. For demo purposes, let’s simply output the password to the console:
```powershell
$UpdateButton.Add_click({
$OutBox.text = ""
If ($NewPwdtextBox.Text -eq $New2PwdtextBox.Text){
$PDC = Get-ADDomainController -Filter * | Where {$_.OperationMasterRoles -like 'PDCEmulator'} | Select -ExpandProperty Name
try {Get-ADUser $LoginIDtextBox.Text -Server $PDC |Set-ADAccountPassword -OldPassword (ConvertTo-SecureString -AsPlainText $CurrentPwdtextBox.Text -Force) -NewPassword (ConvertTo-SecureString -AsPlainText $New2PwdtextBox.Text -Force) -ErrorAction stop
$OutBox.text = Write-Output "Password Update"
}catch{
$OutBox.text = Write-Output "Error: $($_.Exception.Message)" }
}
Elseif($NewPwdtextBox.Text -ne $New2PwdtextBox.Text){$OutBox.text = Write-Output "New Password" does not match with "Confirm Password"}
})
```
Step 4: Display the Form
Finally, you need to display the form to the user:
```powershell
$MainForm.ShowDialog()
$MainForm.add_FormClosing({
$Mainform.close()
$MainForm.Dispose()
})
```
Enhancing User Experience
Creating a basic password reset tool is just the beginning. To enhance user experience, consider the following recommendations:
Input Validation
It’s vital to ensure that the password meets certain criteria. You can add logic to validate the password length or complexity before proceeding with the reset function.
Feedback Mechanisms
Providing users with feedback through message boxes or status labels after actions enhances usability. Users will feel more assured that their actions have been registered successfully.
Accessibility Features
Consider adding accessibility features, such as keyboard shortcuts or voice commands. These can make your GUI more inclusive for users with disabilities or those who are not familiar with text-based commands.
User Documentation
Even with an intuitive GUI, some users might still need guidance. Offering a simple help menu or a quick-start guide can be invaluable.
Best Practices for GUI Development in PowerShell
When developing GUIs with PowerShell and WinForms, consider adopting the following best practices:
Keep it Simple: Avoid cluttering the interface with too many options. Focus on the essential features.
Consistent Layout: Maintain a consistent look and feel throughout your application to improve usability.
Responsive Design: Ensure your GUI can adapt to different screen sizes. This makes your tool more versatile.
Testing: Regularly test your GUI with real users to gather feedback. This can help identify areas for improvement.
By adhering to these practices, you can create a robust password reset tool that serves its purpose effectively.
Final Thoughts
Creating graphical user interfaces with PowerShell and WinForms is a powerful way to enhance user interaction with scripts. Not only does it allow users to perform tasks more efficiently, but it also makes your automation scripts much more accessible to those less familiar with command-line tools.
By implementing a simple password reset tool, you can see firsthand how easy it is to develop with PowerShell. As you grow more comfortable, you can expand your tools' complexity and functionality, tailoring them to your specific needs.
Now that you have the foundational skills to create GUIs, the possibilities are nearly limitless. Start experimenting, and who knows? You might just create the next must-have tool for Windows environments.
Keep in mind that the key to a successful tool is consistent updates, user feedback, and a commitment to improvement. Happy coding!

Comments